No products
 View larger
Constructing Trellises and Strainers
by Nik Magnus | © 2014 Woodbridge Fruit Trees | www.woodbridgefruittrees.com.au
Trellis systems
A trellis is a structure or framework upon which to train a plant. Ideally it needs to support itself, support the tree and offer some way of tying branches down so as to define the shape of an espalier system. The trellis system and size should reflect the growth habit of the tree or trees that it’s supporting. For example, a kiwi trellis needs to be long and high to allow the sprawling nature of the kiwi vine, while a step-over apple tree can be easily supported by a single wire stretched at only 50cm from the ground. Although they essentially do the same thing, there are many different types and styles of trellises which can vary with materials, aesthetic and longevity.
Star-picket post and wire.
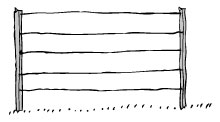 A star picket driven about 30cm into the ground with a post driver at either end of the trellis, and the wires wires threaded through the holes and snitched off. For short spans, (2-3m) the simplest straining method is to span the two posts with something rigid e.g. metal piping or wood across the top. For longer spans, use a straining system, e.g. anchored end post of angled strut strainer, and a star-picket at intervals of 4-5m. Pros: cheap, easy, quick, doesn't involve digging. Can span a quite a long distance if a straining system is used. Cons: Can appear a little industrial as it's essentially a fence. Can be a bit flimsy for longer trellises, where it's better to use sturdy posts at either end.
Wooden posts with wire.
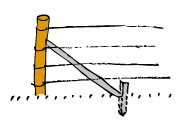 These posts are best driven or cemented 500-600mm into the ground, and when combined with a box or angled strainer system can support wire tension similar to a professional fence. Ideal for longer trellises e.g. 25m long. The wire is looped around the post and connected / strained using 'gripple' wire joiners or a ratchet tensioner. Use interval posts or star-pickets every 3-5m. Pros: relatively inexpensive, sturdy, long lasting option especially for longer trellises. Cons: not as attractive as other systems as often they look like a fence until the tree has covered it.
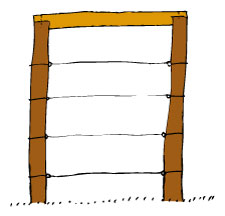
Wooden posts with top frame.
An attractive option for a single tree, the vertical posts do not need to be cemented in as the top beam offers bracing and allows the wires to be tensioned. The top beam can be joined in different ways, but best to hide the end grain of the vertical posts if they're untreated to extend their life. Eye bolts on the inside of the posts allow wire or strings to span at different levels. Pros: attractive and easy to tension. Cons: limited to one tree or two if the beam is long enough.
Wooden post with balustrade wire
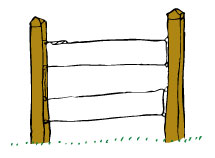
Vertical wooden posts are cemented into the ground, reducing the need for bracing. Eye bolts are screwed in on the inside of the posts to connect stainless steel balustrade wire, connected by a turn buckle for tension. One wire can be threaded through to snake between the posts and form all levels of the trellis with just one tensioning turn buckle. Alternatively, wires can be threaded through holes in the in-between posts and have a tensioning turn buckle on each level (similar to a balustrade). In-between posts are probably best spaced between every tree or second tree. Pros: attractive, long lasting, corrosion resistant, good for short or medium length trellises. Cons: expensive hardware and requires robustly cementing posts into the ground, at least the end ones.
Odds and ends.
Any suitable material can make posts - driftwood, tree limbs, metal rods, rigid plastic pipe. For the horizontals, one can use strong string, rope, sturdy cord, long dowels, bamboo or thin stakes if they can span between posts, wire, stainless steel cable, washing line wire, aluminium brackets, ring-lock fencing. To connect, use rope, zip ties, eye bolts, wire loops. As long as the structure holds itself up, supports the tree and allows the branches to be tied down, then it’s a trellis despite it's unorthodox method.
Lattice
A lattice is made of crossing overlapping material, often used as a screen or fence, which can make a decorative trellis. Often made of thin batons of wood, nailed or stapled together, but also available in rigid or flexible plastic, coarse ring lock fence, or a coarse wire mesh. If free standing, the lattice needs to be supported by posts (star pickets or cemented posts) or fixed onto a wall. A lattice allow for very flexible positioning of the espaliered limbs. Pros: decorative, especially good for fan espalier and to fix onto a wall. Cons: usually for a single tree, lattice can be costly.
A wall
Often a wall lends itself to espaliering, and it’s tempting to try and drill into the wall to support a trellis. For a rigid lattice, that would work fine, but for any other system, it’s best to erect an independent trellis 30cm off the wall. Unlike creepers, fruit trees do better when there is air flow between the wall and the branches.
Large trellis / pergola / arbour / archway.
For something like a kiwi or grape and other vines, a larger structure is needed. The posts ideally would be driven in or cemented in, with some cross bracing to protect from wind damage. The horizontal beams that connect the posts may be covered by chicken wire, or support battens allowing the vine to ramble along it and the fruit to hang down.
Espalier systems and wire spacing.
The traditional 'horizontal-T' and KNNN methods are easily tied onto the horizontal wires of a trellis. A fan espalier however will need to tie onto the wires where the branches intersect. A bamboo pole tied onto the branch makes it easy for it then to be fixed onto a wire. The number of wires is determined by the height and number of tiers. As a starting point, 30-40cm apart would be a reasonable spacing. For a 4 wire spacing, 40cm would reach 1.6m high, while a 5 wire spacing at 35cm apart would reach 1.75m high. Some horizontal T espalier methods are only two tier, one at 70cm and one at 1.4m yielding plenty of fruit.
Tatura trellis.
Two posts making a 'V' shape at either end of the trellis allow for two trellis fences to sit about 60 degrees apart. Used mostly in commercial orchards using the wooden posts with wire along with a anchored end post or box strainer to allow for long spans. In a small garden setting, a tatura trellis can be made using any of the above methods.
Straining systems.
The end posts in any trellis bear the inward drawing force of the wires, as they are pulled taught. Unless thick posts are cemented in at either end, a strainer system is need to hold the wires tight and prevent the end posts being pulled in.
Box strainer assembly.
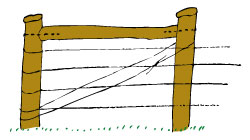 This is the best and most used straining system for fences. It consists of two posts 2-3m apart, with a horizontal beam connecting them (to make the box shape), plus a wire diagonally in between. The diagonal must start from the base of the end post, up to the upper end of the inner post, strained tight. Different methods of tensioning the diagonal wire
 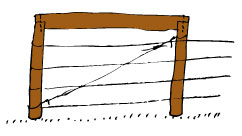 include a gripple wire connector, a ratchet strainer or a loop of wire that is twisted by a wooden stake. The beam connecting the to posts can be of smaller diameter than the posts, and fastened by long metal pegs. Pros: this is the most reliable and trouble free straining system, adjustable and tidy. It can support high tension over long distances. Cons: it requires 2 posts driven or dug into the ground and a third as a beam, increasing the cost. The box does tend to visually dominate the end of the trellis system until the tree grows up to hide it.
Angle strut strainer.

The end post is prevented from being pulled inwards by an rigid angled bracket that is itself held in place by a smaller ground peg inside the end-post. The angle bracket should connect to the post in it’s top third or quarter, and then connect to a sturdy ground peg making an angle of 30-40 degrees. Some pre-made systems have a 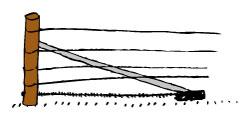 thick plastic bottom plate which connects back to the end post by threaded rod that can be tensioned and adjusted, but they are more expensive. Pros: requires half as many posts dug into the ground as the box strainer. Visually less dominating and simpler and cheaper to construct than box strainer. Cons: unless the pre-made system is used, this system cannot be adjusted easily.
Anchored end post.
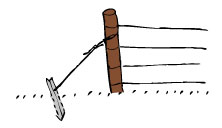 The post is strained by a wire connected to a ground peg outside the fence, and tensioned by a ratchet, gripple connector or twisted loop of wire. The ground peg can be made of a short picket post driven into the ground perpendicular to the wire (cheap), or a screw in ground peg (more expensive). Pros: simple, adjustable tensioning system. Cons: the wire at the end of the post often gets in the way of weeding and mowing, and the peg if protruding can be a trip hazard. Recommended to place a visual cover over exposed star pickets (e.g. a bucket).
by Nik Magnus | © 2014 Woodbridge Fruit Trees | www.woodbridgefruittrees.com.au
Trellis systems
A trellis is a structure or framework upon which to train a plant. Ideally it needs to support itself, support the tree and offer some way of tying branches down so as to define the shape of an espalier system. The trellis system and size should reflect the growth habit of the tree or trees that it’s supporting. For example, a kiwi trellis needs to be long and high to allow the sprawling nature of the kiwi vine, while a step-over apple tree can be easily supported by a single wire stretched at only 50cm from the ground. Although they essentially do the same thing, there are many different types and styles of trellises which can vary with materials, aesthetic and longevity.
Star-picket post and wire.
 A star picket driven about 30cm into the ground with a post driver at either end of the trellis, and the wires wires threaded through the holes and snitched off. For short spans, (2-3m) the simplest straining method is to span the two posts with something rigid e.g. metal piping or wood across the top. For longer spans, use a straining system, e.g. anchored end post of angled strut strainer, and a star-picket at intervals of 4-5m. Pros: cheap, easy, quick, doesn't involve digging. Can span a quite a long distance if a straining system is used. Cons: Can appear a little industrial as it's essentially a fence. Can be a bit flimsy for longer trellises, where it's better to use sturdy posts at either end.
Wooden posts with wire.
 These posts are best driven or cemented 500-600mm into the ground, and when combined with a box or angled strainer system can support wire tension similar to a professional fence. Ideal for longer trellises e.g. 25m long. The wire is looped around the post and connected / strained using 'gripple' wire joiners or a ratchet tensioner. Use interval posts or star-pickets every 3-5m. Pros: relatively inexpensive, sturdy, long lasting option especially for longer trellises. Cons: not as attractive as other systems as often they look like a fence until the tree has covered it.

Wooden posts with top frame.
An attractive option for a single tree, the vertical posts do not need to be cemented in as the top beam offers bracing and allows the wires to be tensioned. The top beam can be joined in different ways, but best to hide the end grain of the vertical posts if they're untreated to extend their life. Eye bolts on the inside of the posts allow wire or strings to span at different levels. Pros: attractive and easy to tension. Cons: limited to one tree or two if the beam is long enough.
Wooden post with balustrade wire

Vertical wooden posts are cemented into the ground, reducing the need for bracing. Eye bolts are screwed in on the inside of the posts to connect stainless steel balustrade wire, connected by a turn buckle for tension. One wire can be threaded through to snake between the posts and form all levels of the trellis with just one tensioning turn buckle. Alternatively, wires can be threaded through holes in the in-between posts and have a tensioning turn buckle on each level (similar to a balustrade). In-between posts are probably best spaced between every tree or second tree. Pros: attractive, long lasting, corrosion resistant, good for short or medium length trellises. Cons: expensive hardware and requires robustly cementing posts into the ground, at least the end ones.
Odds and ends.
Any suitable material can make posts - driftwood, tree limbs, metal rods, rigid plastic pipe. For the horizontals, one can use strong string, rope, sturdy cord, long dowels, bamboo or thin stakes if they can span between posts, wire, stainless steel cable, washing line wire, aluminium brackets, ring-lock fencing. To connect, use rope, zip ties, eye bolts, wire loops. As long as the structure holds itself up, supports the tree and allows the branches to be tied down, then it’s a trellis despite it's unorthodox method.
Lattice
A lattice is made of crossing overlapping material, often used as a screen or fence, which can make a decorative trellis. Often made of thin batons of wood, nailed or stapled together, but also available in rigid or flexible plastic, coarse ring lock fence, or a coarse wire mesh. If free standing, the lattice needs to be supported by posts (star pickets or cemented posts) or fixed onto a wall. A lattice allow for very flexible positioning of the espaliered limbs. Pros: decorative, especially good for fan espalier and to fix onto a wall. Cons: usually for a single tree, lattice can be costly.
A wall
Often a wall lends itself to espaliering, and it’s tempting to try and drill into the wall to support a trellis. For a rigid lattice, that would work fine, but for any other system, it’s best to erect an independent trellis 30cm off the wall. Unlike creepers, fruit trees do better when there is air flow between the wall and the branches.
Large trellis / pergola / arbour / archway.
For something like a kiwi or grape and other vines, a larger structure is needed. The posts ideally would be driven in or cemented in, with some cross bracing to protect from wind damage. The horizontal beams that connect the posts may be covered by chicken wire, or support battens allowing the vine to ramble along it and the fruit to hang down.
Espalier systems and wire spacing.
The traditional 'horizontal-T' and KNNN methods are easily tied onto the horizontal wires of a trellis. A fan espalier however will need to tie onto the wires where the branches intersect. A bamboo pole tied onto the branch makes it easy for it then to be fixed onto a wire. The number of wires is determined by the height and number of tiers. As a starting point, 30-40cm apart would be a reasonable spacing. For a 4 wire spacing, 40cm would reach 1.6m high, while a 5 wire spacing at 35cm apart would reach 1.75m high. Some horizontal T espalier methods are only two tier, one at 70cm and one at 1.4m yielding plenty of fruit.
Tatura trellis.
Two posts making a 'V' shape at either end of the trellis allow for two trellis fences to sit about 60 degrees apart. Used mostly in commercial orchards using the wooden posts with wire along with a anchored end post or box strainer to allow for long spans. In a small garden setting, a tatura trellis can be made using any of the above methods.
Straining systems.
The end posts in any trellis bear the inward drawing force of the wires, as they are pulled taught. Unless thick posts are cemented in at either end, a strainer system is need to hold the wires tight and prevent the end posts being pulled in.
Box strainer assembly.
 This is the best and most used straining system for fences. It consists of two posts 2-3m apart, with a horizontal beam connecting them (to make the box shape), plus a wire diagonally in between. The diagonal must start from the base of the end post, up to the upper end of the inner post, strained tight. Different methods of tensioning the diagonal wire
  include a gripple wire connector, a ratchet strainer or a loop of wire that is twisted by a wooden stake. The beam connecting the to posts can be of smaller diameter than the posts, and fastened by long metal pegs. Pros: this is the most reliable and trouble free straining system, adjustable and tidy. It can support high tension over long distances. Cons: it requires 2 posts driven or dug into the ground and a third as a beam, increasing the cost. The box does tend to visually dominate the end of the trellis system until the tree grows up to hide it.
Angle strut strainer.

The end post is prevented from being pulled inwards by an rigid angled bracket that is itself held in place by a smaller ground peg inside the end-post. The angle bracket should connect to the post in it’s top third or quarter, and then connect to a sturdy ground peg making an angle of 30-40 degrees. Some pre-made systems have a  thick plastic bottom plate which connects back to the end post by threaded rod that can be tensioned and adjusted, but they are more expensive. Pros: requires half as many posts dug into the ground as the box strainer. Visually less dominating and simpler and cheaper to construct than box strainer. Cons: unless the pre-made system is used, this system cannot be adjusted easily.
Anchored end post.
 The post is strained by a wire connected to a ground peg outside the fence, and tensioned by a ratchet, gripple connector or twisted loop of wire. The ground peg can be made of a short picket post driven into the ground perpendicular to the wire (cheap), or a screw in ground peg (more expensive). Pros: simple, adjustable tensioning system. Cons: the wire at the end of the post often gets in the way of weeding and mowing, and the peg if protruding can be a trip hazard. Recommended to place a visual cover over exposed star pickets (e.g. a bucket).
Reviews
No customer reviews for the moment.
